In the past all audio recordings for classrooms and events outside of the Main Auditorium and Lakeside were recorded into ProTools, with a staff member setting up the ProTools sessions and manually patching the different rooms into ProTools.
At the end of March of 2012, that staff member retired and so the challenge was, “can we still record the classrooms without needing a staff member?” The solution needed to be automated enough so that the only part that required a human or staff member to be involved, was the final editing.
The solution needed to be automated, somehow transfer the files to our network so that the editors could retrieve the file, and cost effective. Also, we needed to get 24-30 signals from around our campus to one central location where the recording solution would be.
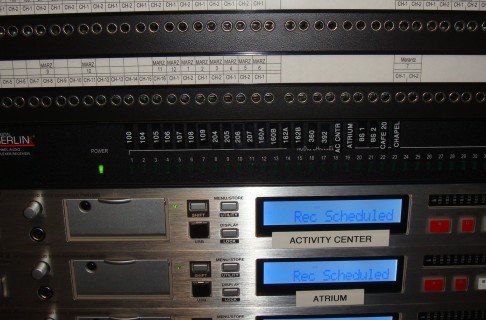
The first problem seemed easy. A Marantz PMD580 seemed to be the perfect solution. It connects to a network, has a web interface, schedule, analog balanced audio, and records to an inexpensive CF (compact flash) card. We already had two of these on campus. One in the Main Auditorium and one in Lakeside. The one in Lakeside was already set up to record the midweek, and high school ministry, and then transfer the files to a network folder to be picked up by anyone who needed to grab the file.

Looking over the different rooms on our campus and seeing which ones generally had the most classes and recording requests in the past, I determined that we needed 12 PMD580 units. This would allow us to have 12 rooms normalled to a dedicated recorder. The rest of the rooms would land on a patch bay and if a request came in for one of those, then they would need to be manually patched to a recorder.
The next problem was how to get 24-30 balanced audio signals from around campus. Initially, we thought, let’s just pull a 32 channel snake from one of our network closets where all of the audio lines could hit before heading to what we call “the core”; this is where all of our audio and video routing from around campus is located. The thought of pulling a big heavy copper snake did not sound appealing at all. We were then informed that the IT department was pulling fiber for telephone to replace rusted copper lines. We inquired if we could tag on to that fiber pull and pay for a few extra strands to be dedicated to audio and video.
After they agreed to us tagging on, we worked to find a product that would convert multiple channels of analog audio to fiber. Our rep at AVI Systems showed us a product that was a perfect solution! It allowed for 32 channels of balanced analog audio over 1 fiber strand. The solution was the Fiberlink 4320 receiver/transmitter by CSI Inc.
This product has both a transmitter and receiver in order to work. We put the transmitter in the central location where all the audio lines from around campus landed. Then our IT deparment ran the fiber from this room into our “core” where the receiver lives. From here, the receiver then converts back to analog audio which I then landed on a patchbay. We use the MINI SHORTI Quick Switch patchbays from www.patchbays.com. Then, knowing which recorders were going to have a normalized feed, I then wired up the output of the patchbay to each recorder. Since we are sending mono from all of the classrooms, I wired only the left side of the recorder. The Marantz units allow you to set the record format as L/R mono.
Once the recorders were all wired up, it was time to figure out the workflow from record to edit. The main settings I had to set in the recorders is to choose PCM, which creates a WAV file. The other option is MP3 but our final edit is done in ProTools and so in order to not have to convert the files there, WAV is the easiest, plus, there is no compression or double compression, because we flip the edited master to MP3. I also set the bitrate to 16 with a 44.1kHz sample rate.

The other nice thing about these units is that they have auto level control (ALC) which helps without having to have someone check the levels coming to the units.
Finally, and this is what makes the automation seamless, I needed to setup the archive settings. The archive settings allow you to route to a network folder. All you need to know is the network folder location, the IP address of the server, and the username and password. What this does is that once you have scheduled an event to record, as soon as it is done recording, it will automatically transfer the file to our digital asset management system (DAM). This allow is to automatically be archived for future uses. Now if you don’t want to have it automatically transfer you can always click on the file in the web interface and it will start to automatically download to your computer.
So now the infrastructure was in place, but how would people request a recording for their event? We love online forms that interface with our ticket system, so I went to the creator of our webpages and manager of our ticket system, Matt Satorious of sators.com. I worked with him to to figure out what forms and pull down menus we needed. What we ended up landing on is this form, http://systems.willowcreek.org/recording/ You can see that we have all of this info necessary for our editors and the Digital Asset Management (DAM) system.
It was that simple; our workflow is that we have people fill out the online recording form, it automatically makes a ticket in our ticket system, our team gets notified, there are macros to let people know their request has been received, and then our team schedules all of their dates in the recorder for their room, and then let them know it’s been scheduled. Throughout the whole process, they receive the latest updates on the success of their file being finalized, edited, and then where it’s delivered to for them to pick up or work with our Seeds department for duplication.


